
Profile Information #
Open Settings from the main navigation. Every settings section is listed down the left side of the page (an accordion on small screens), and this guide follows them in that order. These settings belong to you, not to a channel: anything that differs per channel, such as calendar sync or a channel’s own sending address, lives in the channel’s settings instead. That includes the notification emails you get about a channel, such as a new ticket sale or a new event request, which are chosen on its Notifications tab.
Profile Information itself is split into two tabs, General and Localization. A third tab, Accessibility, appears only after you have hidden the accessibility widget, and its single button brings the widget back.
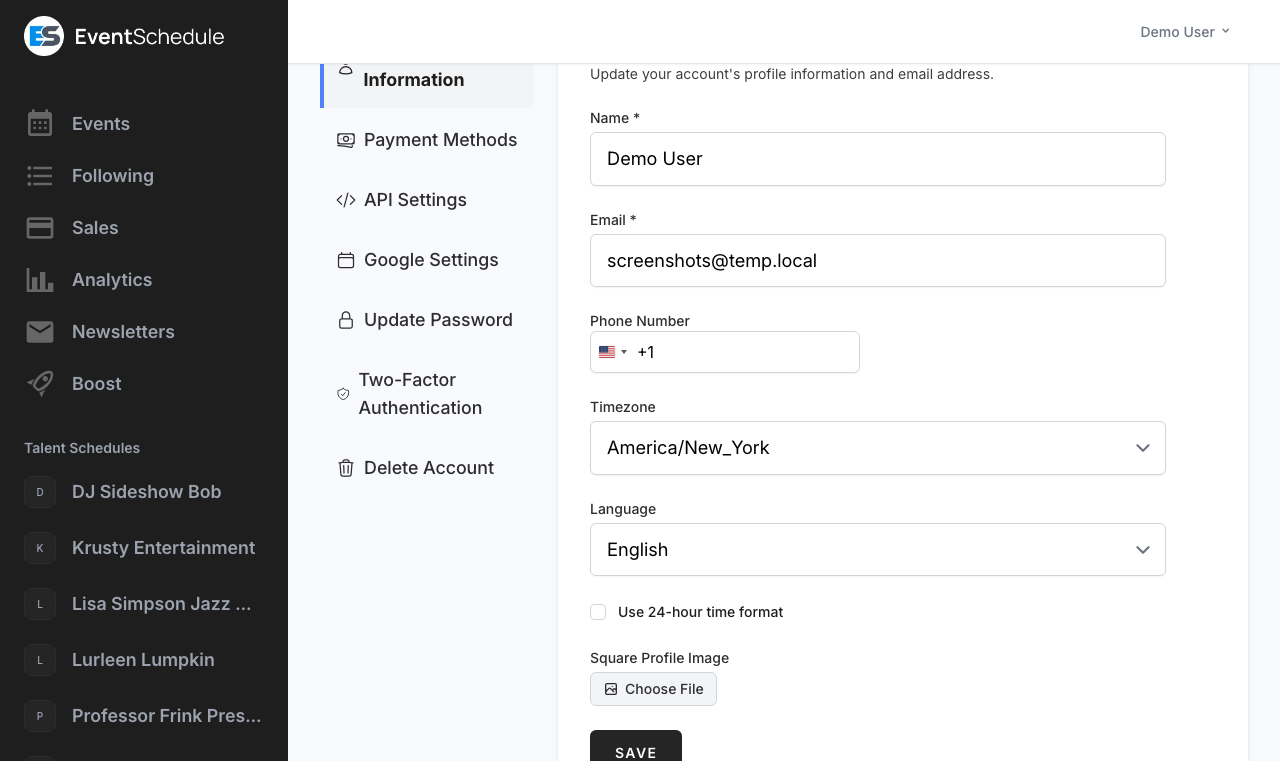
General #
| Setting | Description |
|---|---|
| Name | Required. Your display name, shown to the other members of any channel you belong to. |
| Required. The address you sign in with and where account email is sent. Editing it clears your verification: the field then shows an unverified notice with a link to re-send the verification email. | |
| Email updates | On by default. Covers newsletters, tips, the weekly summary and updates on events you asked other channels to list. Turning it off (or using the Unsubscribe link at the bottom of one of those emails) stops them all. Receipts, password resets and the notifications you turned on for your own channels are always sent. |
| Phone Number | Optional, in international format. On the hosted platform you can verify it by SMS. A verified number is required before you can buy ad campaigns and on-network promotions, and it lets a channel without its own email settings send newsletters and automatic new-event emails to more than 50 people at once. If one of your channels uses the same number, that channel’s number counts as verified too. |
| Default Channel | Only shown when you can edit more than one channel. It decides which channel a new event belongs to when you start from the general Add Event entry point rather than from a channel. |
| Square Profile Image | Your avatar, as a PNG or JPEG. A square image works best: the form warns you if the picture is not square or is larger than 2.5MB. Use the small red cross on the thumbnail to remove the current image. |
Localization #
| Setting | Description |
|---|---|
| Timezone | Controls how dates and times are shown to you throughout the app. Event times are stored in UTC and converted to this timezone while you are signed in. |
| Language | Sets the interface language. Twelve languages are available: Arabic, Dutch, English, Estonian, French, German, Hebrew, Italian, Portuguese, Romanian, Russian and Spanish. |
| Use 24-hour time format | Switches between 12-hour (AM/PM) and 24-hour clocks across the app. |
| Ask me before I follow a new channel | On by default. Shows a short consent notice, explaining that the channel will see your name and email, the first time you follow a channel. Turn it off to follow in one click. |
Appearance #
The Appearance tab in Settings controls how the admin portal looks. You can also change it on any page from the Theme button in the row of icons pinned to the bottom of the sidebar, which opens the same Theme and Palette controls in a popup.
Theme chooses Light, Dark, or System. System follows your device’s own light/dark setting and updates the moment your device switches.
Palette then picks the exact colours. There are three light palettes and three dark ones, and you set each side independently – the palette row shows the three options for whichever mode you are currently viewing, so switch Theme to Dark to choose your dark palette.
| Palette | Description |
|---|---|
| Sand | Light. Warm beige page with white panels. |
| Mist | Light. Cool blue-grey page with white panels. The default. |
| Paper | Light. Crisp white page with softly recessed panels. |
| Espresso | Dark. Warm deep brown. |
| Midnight | Dark. Cool charcoal-navy. The default. |
| Carbon | Dark. True black, easiest on OLED screens. |
Your choice is stored in your browser rather than on your account, so it applies to the device you set it on. Set it again on your phone or another computer to match. Public channel pages are unaffected – they keep the colours the channel owner configured.
Payment Methods #
Cash needs nothing set up. To take payment any other way, connect a method here: there are five, each on its own tab – Stripe, Invoice Ninja, Payment Link, Payfast and PayPal. Which one an event uses is decided per event, on the event’s Payment tab, so connecting more than one lets you route different events differently. With nothing connected, an event can only take cash, unless the site you are on provides an account for everyone, as described below. Taking money for a ticket is the Pro plan, and it comes with all five; a free channel sells nothing priced, so it needs none of them.
Stripe #
Stripe gives the most integrated experience: the buyer pays on Stripe’s secure checkout page and comes straight back, the sale is marked paid automatically and the ticket with its QR code is emailed straight away. It is also the only method that can take installment payments Pro – Requires the Pro plan .
Hosted platform
Click Connect Stripe to start Stripe Connect onboarding, then complete the details on Stripe. Until Stripe finishes reviewing them the tab shows your account ID labelled [Pending]. Buyers are charged on your own Stripe account, so payouts and Stripe’s own processing fees are between you and Stripe. EventWillow adds no platform fee of its own.
Selfhosted
Stripe is configured once at the server level with the STRIPE_PLATFORM_KEY and STRIPE_PLATFORM_SECRET variables in your .env file, not per account. The tab simply reports whether the server has Stripe configured. See the
selfhosted Stripe setup guide
.
Disconnecting
Click Unlink Account under the account name in the Stripe tab and confirm. This only removes the connection to EventWillow; your Stripe account and its history are untouched.
Invoice Ninja #
Connect your Invoice Ninja account to take payment through any gateway Invoice Ninja supports, and to have each sale land in your books as an invoice. This is often the easiest route for a selfhosted deployment.
Connecting
Enter your API Token (required) and, if you selfhost Invoice Ninja, the API URL. The token is in Invoice Ninja under Settings → Account Management. Enter the base address of your installation, without /api/v1, or leave the API URL blank to use the hosted invoicing.co service. Saving verifies the credentials against your installation, which can take up to 30 seconds.
Changing credentials
Once connected, click Edit next to the company name to correct the API URL or rotate the token. Leave the token blank to keep the existing one. Your current connection is only replaced once the new credentials work.
Checkout modes
After connecting, the tab offers two checkout modes: invoice mode (buyers pick tickets in EventWillow) and payment link mode (buyers pick tickets on Invoice Ninja’s purchase page, with grouped invoices). See Invoice Ninja Modes for a full comparison. If a payment link cannot be created for a sale, that checkout falls back to invoice mode automatically.
Troubleshooting
If the connection fails, a red panel at the top of the Invoice Ninja tab names the reason and shows the raw error, and the full detail is written to your application log. Common causes for selfhosted installations are a firewall, Cloudflare or other bot protection blocking API requests from your EventWillow server, an http URL that redirects to https, and a self-signed TLS certificate the server does not trust.
Disconnecting
Click Unlink Account next to the company name in the Invoice Ninja tab and confirm.
TipBefore you connect, the tab shows a special offer link: first-time Invoice Ninja users may be eligible for a free 1-year upgrade to Invoice Ninja Pro.
Payment Link #
The tab is labelled Payment Link. It points buyers at any external payment page you already have: a bank transfer page, a donation page, your own shop’s checkout, anything with a URL. To take PayPal payments that confirm themselves, connect PayPal on its own tab instead.
How it works
Enter the URL where buyers should pay and save. When somebody buys a ticket for an event using this method, the sale is recorded and the buyer is redirected to your URL. Because the money moves outside EventWillow, the sale stays unpaid until the payment is confirmed.
Removing it
Click Unlink Account under the saved URL and confirm. The field is then empty and ready for a new URL.
Payfast #
Payfast is a South African gateway, useful where Stripe is not available. Like Stripe it confirms the payment and releases the ticket on its own, with no manual step. It settles in South African rand only, so it appears as an option on events priced in ZAR and nowhere else.
What to enter
Your Merchant ID, Merchant Key and passphrase, all three from Settings in your Payfast dashboard. Set a passphrase there first if you have not already – it is required here, because it is what proves a payment notification genuinely came from Payfast.
Test mode
Sends payments to Payfast’s sandbox so nothing is really charged. While it is on, the payment method reads (Test mode) on the event form and buyers see a notice on the payment page. Turn it off before you sell real tickets.
Payment methods
By default Payfast shows buyers everything your account supports – card, Instant EFT, Capitec Pay and the rest. Tick exactly one to send buyers straight to it; tick none, or several, and the choice stays with Payfast.
Removing it
Click Unlink Account and confirm. Any event still set to Payfast keeps the setting but shows it as no longer available, so you can see it and pick something else. The exception is a site that provides its own Payfast account (below): there, unlinking hands your events back to the site’s account rather than stopping them selling, and the money goes there instead.
“Provided by this installation”
On a selfhosted site, the administrator can set up one Payfast account for everyone. If you see this, you can start selling immediately and there is nothing to fill in – payments settle into the site’s account. Enter your own details to be paid into your own account instead, and unlink them again to go back.
For the full walkthrough, including the sandbox credentials and what happens to an event priced in another currency, see Connecting Payfast.
PayPal #
PayPal confirms the payment and releases the ticket on its own, with no manual step. It is worth choosing where Stripe is not available, or where your buyers would rather pay from a PayPal balance than type a card into a page they have not seen before. It settles a fixed list of currencies – if your event is priced in something else, PayPal simply does not appear as an option.
What to enter
Your Client ID and Secret. Both come from an app you create at developer.paypal.com under Apps & Credentials. Make sure you are on the Live tab unless you are testing – the Sandbox tab issues a different pair.
They are checked when you save
We ask PayPal whether the details work before storing them, so a mistyped secret is caught here rather than by a buyer. If PayPal itself cannot be reached, the details are saved anyway and you are told they could not be checked – take a test payment before you sell.
Test mode
Uses your PayPal sandbox credentials so nothing is really charged. While it is on, the payment method reads (Test mode) on the event form and the Payment tab shows a warning. Turn it off before you sell real tickets – test tickets look exactly like real ones.
Removing it
Click Unlink Account and confirm. The listener we registered with PayPal is removed at the same time. Any event still set to PayPal keeps the setting but shows it as no longer available, so you can see it and pick something else. The exception is a site that provides its own PayPal account (below): there, unlinking hands your events back to the site’s account rather than stopping them selling, and the money goes there instead.
“Provided by this installation”
On a selfhosted site, the administrator can set up one PayPal account for everyone, exactly as with Payfast. If you see this, you can start selling immediately and there is nothing to fill in – payments settle into the site’s account. Enter your own details to be paid into your own account instead, and unlink them again to go back.
PayPal settles Australian, Canadian, Hong Kong, New Zealand, Singapore and US dollars, the euro, sterling, the Swiss franc, the Czech koruna, the Danish, Norwegian and Swedish krone, the Brazilian real, the Chinese yuan, the Israeli shekel, the Malaysian ringgit, the Mexican peso, the Philippine peso, the Polish zloty, the Russian rouble and the Thai baht. For the full walkthrough see Connecting PayPal.
NoteOne payment method is enough. Stripe, PayPal and Payfast all confirm payment and deliver the ticket without any manual step, so pick whichever of them works where you are. Invoice Ninja marks the sale paid once the invoice is paid, through the webhook it registers when you connect. With a payment link, you mark each sale paid yourself.
Refunds differ too. A Stripe or PayPal sale can be refunded in full or in part from the Sales page, and the money goes back through the provider. For every other method, Mark as Refunded records a refund you have made yourself. See Managing Sales.
API Settings #
This section issues the key that authenticates REST API requests for your account. The endpoints themselves are a Pro feature: the key can be generated on any plan, but every call is checked against the channel it touches and a channel below Pro is refused. See the API Reference for the full endpoint list.
Enable API Access #
A single toggle. Saving it on generates a key straight away. Saving it off deletes the key, so anything using it stops working immediately.
API Key
The full key is displayed exactly once, right after it is generated, next to a copy button. From then on the field shows dots and there is no way to reveal the key again, so store it somewhere safe the moment you create it. Send it as the X-API-Key request header.
Expiry
A key is valid for one year from the day it is issued. After that requests are rejected as expired, and you get a fresh key by turning the toggle off and on again.
ImportantThe key grants the same access to your account that you have. If you suspect it has leaked, turn the API off and on again: that deletes the old key and issues a new one, and the old key stops working at once.
Webhooks #
A webhook POSTs a JSON payload to a URL of yours whenever something happens in your channels, such as a sale, a refund, an event change or a check-in. Webhooks are a Pro feature: if none of your channels are on Pro the section shows an upgrade notice, and activity on a channel below Pro is never delivered. See the Webhook documentation for payload formats and signature verification.
Adding a webhook #
- Enter the endpoint URL that should receive the requests.
- Add an optional Description so you can tell endpoints apart in the list.
- Under Event types, leave every type switched on or turn off the ones you do not want. All types are on by default.
- Click Add Webhook. The signing secret appears once at the top of the section with a copy button, and is never shown again.
Managing webhooks #
Each saved webhook is a row with its description, URL and subscribed event types, and a row of icon buttons:
- Enable or disable the endpoint. A disabled webhook is dimmed and receives nothing.
- Send a test ping to check the endpoint answers.
- Edit opens a panel to change the URL, description and event types, and holds the Regenerate secret link.
- Delete the endpoint after a confirmation.
View recent deliveries under each webhook expands a log of the latest attempts, with the event type, the response status (or timeout), how long the request took and when it ran. The row also shows when the endpoint last fired.
Google Settings #
Two separate Google connections live here. Connecting one does not connect the other, and each can be disconnected on its own.
Google Account #
Links your Google identity so you can sign in with Google. Disconnect is only available while you have another way to log in (a password, or a connected Facebook account), otherwise you would lock yourself out; set a password first under Update Password.
Google Calendar
Authorises two-way sync between EventWillow and your Google Calendar. Every member of a channel connects their own Google account here, so one shared channel can sync into several personal calendars. Once connected, switch sync on for each channel under Integrations.
NoteA synced calendar gets one entry per event date that EventWillow pushes, not a repeating series: a recurring event arrives as a single entry on the date the series starts. Subscribe to the channel’s calendar feed instead if you want each date of a recurring event in your calendar: it lists every date for the next 90 days and updates itself when dates change.
TipConnecting your account here does nothing on its own. Sync is enabled per channel in the channel’s settings, and each team member controls their own connection.
Outlook Calendar #
The section is called Outlook Calendar in the settings navigation. It connects your Outlook or Microsoft 365 account through the Microsoft Graph API.
Connecting #
Click Connect Outlook Calendar and approve the permissions on Microsoft. Changes then flow both ways: Microsoft notifies EventWillow as they happen, and a catch-up sync runs every 15 minutes in case a notification is missed. Once connected, switch sync on for each channel under Integrations.
Selfhosted installations
The integration needs Microsoft app credentials on the server. Without them the section reads “Outlook Calendar is not configured on this server” and there is no connect button. See the selfhosted Outlook setup guide .
TipEnable the Teams meetings option on a channel to have a Microsoft Teams meeting created automatically for its online events.
Facebook Settings #
Links your Facebook account so you can log in with Continue with Facebook. The section only appears when Facebook login is enabled on the installation. It is only for logging in: your events are not imported from or published to Facebook.
Connecting #
Click Connect Facebook Account and approve on Facebook. If you use Continue with Facebook on the login page and an account with your email already exists, you are asked to log in once the usual way; your Facebook account is linked as soon as you do.
Disconnecting
Disconnect is only available while you still have another way to log in: a password, or a connected Google account. Set a password first under Update Password if Facebook is your only one.
Setting it up
Facebook login needs a Facebook app configured by whoever runs the installation. Without it there is no Facebook button or settings section. See Facebook login setup .
Backup & Restore #
Export your channels as a portable .zip file, or restore one you exported earlier. A backup carries the channel itself and its sub-channels, and every event with its ticket types, promo codes, sales (installment plans and refunds included), agenda, polls, fan content, feedback, waitlist and interest list. It also carries the channel’s gift cards, appointment types, seating plans and newsletters, and optionally the images. Curator event sources are not included: add them again on the restored channel. The section has two tabs, Export and Import.
Exporting #
- On the Export tab, review the channel list. Every channel you can edit is listed and all are selected, so clear the ones you do not want.
- Turn on Include images to bundle profile images, flyers and photos. It is off by default and makes the file considerably larger.
- Click Export. Progress is reported in place, item by item, and you can cancel while it runs.
- When it finishes, a Download link appears. The link expires after 7 days. On installations that run a queue worker you also get an email when the export is ready.
Importing #
- On the Import tab, choose a
.zipexport and click Upload. - A preview lists each channel in the file with its type, its event, ticket and sale counts and its date range. All are selected, so clear any you do not want.
- Click Start Import. Imported channels are always created as new channels, so nothing you already have is overwritten.
- When it finishes you get a report per channel, counting what was imported for each kind of record and listing any warnings, with a link to the new channel. On installations that run a queue worker the detailed report is also emailed to you.
NoteOn the hosted platform, exports leave out your email subscribers, newsletter recipient addresses, segment contacts and unsubscribe lists.
ImportantEvery export contains personal data, such as your ticket buyers’ names and email addresses and the addresses on each event’s waitlist and interest list, so store the files securely. On a selfhosted installation it also carries your email subscribers and newsletter contacts. To move a whole installation to another server,
mysqldumpis a better tool than export and import.
App Update #
On a selfhosted installation this section shows the Installed Version next to the Latest Version published on GitHub. If they match it simply says you are up to date. If they differ, an Update button downloads and applies the new release in one click.
A large update can outrun PHP’s execution limit. If it times out, run php artisan app:update from the command line, raise max_execution_time in php.ini, or download the release zip linked under the button and extract it to /tmp/eventschedule/ before trying again.
NoteThis section never appears on eventschedule.com, where everyone is always on the latest version automatically. On a single-tenant selfhost any signed-in user sees it; on a selfhosted platform running in hosted mode it is limited to the instance administrator, so a customer cannot update the whole installation.
Instance admins have the same panel at Admin > System > App Update, which adds a last-checked time, a manual check and a badge on the System menu when a release is waiting. Either way,
php artisan app:updatedoes the same job from the command line and works even when neither screen is available.
Update Password #
Enter your current password, choose a new one and save. A password must be at least 8 characters long.
If your account was created by signing in with Google or Facebook it has no password yet, and the section is titled Set Password instead. It first asks you to confirm who you are with that account; after that you have a few minutes to choose a password, and only the new password field is shown.
TipSetting a password is also what makes it possible to disconnect Google later, and it gives you a way in if you ever lose access to your Google account.
Two-Factor Authentication #
Two-factor authentication (2FA) adds a second step to signing in, using a time-based one-time password from an authenticator app such as Google Authenticator, Authy or 1Password.
Turning it on #
- Enter your current password and click Enable Two-Factor Authentication. Accounts with no password, created by signing in with Google or Facebook, are not asked for one.
- Scan the QR code with your authenticator app. If you cannot scan, type the key printed under the code into the app by hand.
- Save the recovery codes shown on the same screen, somewhere other than the device holding the authenticator app.
- Type the 6-digit code from the app and click Confirm. Two-factor authentication is not active until this step succeeds.
Afterwards #
Recovery codes
Each code works once and lets you sign in without the authenticator app. Regenerate Codes issues a fresh set and displays it once; every earlier code stops working at that moment.
Turning it off
Click Disable and type your password into the prompt, which only appears if your account has one. Disabling removes the authenticator secret and every remaining recovery code, so switching 2FA back on later starts from a new QR code.
ImportantStore your recovery codes securely. If you lose the authenticator app and no longer have the codes, you will not be able to sign in.
Your Data #
Download my data prepares a copy of the personal data held about your account and its email address, and emails you a link to it, valid for seven days. It covers your profile, the channels you belong to, tickets and bookings you made (including ones bought before you had an account), channels you follow or get emails from, newsletters you received with whether you opened them, comments, photos and videos you posted, support chats, and the security log of your account. It is one JSON file, which a text editor can open and other services can import. Your channels’ own content and images are not in it: those are in each channel’s backup. The link is sent by email only, so the button is not offered on an install that cannot send email.
It is not a backup of your channels: for their events, settings and audience, use Backup & Restore.
Delete Account #
Permanently deletes your account and everything attached to it. That means:
- Your user account, profile and profile image
- Every channel you own, with its events, tickets and sales
- Comments, photos and videos you posted while signed in (on ones you posted without signing in, your email address is removed), your follows and email sign-ups, and any waitlist entry or request for event updates under your address
- Connections to linked services such as Stripe and Google, including any calendar sync they were running; EventWillow also asks Google to revoke its access
- Any paid plan on those channels, which is cancelled immediately rather than at the end of the billing period. The rest of the period is not refunded, and the confirmation dialog warns you when you have a paid plan
Some records stay, because they belong to other people or are needed to honor your choices. Tickets, bookings and gift cards you bought stay in the organizer’s records, under the name and email you used. Events and newsletters you created on a channel someone else owns stay on that channel, handed to its owner. A channel keeps its record of the newsletters it sent you, with whether you opened them, and any mailing list an organizer imported your address into. An unsubscribe is kept, so that channel cannot email you again. The security log keeps its entries for up to 90 days, no longer linked to the account.
Clicking Delete Account opens a confirmation dialog with an optional Why are you leaving? box. On eventschedule.com, anything you write there is emailed to the EventWillow team as feedback and helps us improve the platform. Before that, download anything you want to keep, for example with Download my data and Backup & Restore.
WarningDeletion is permanent and cannot be undone. If your account has a password you are asked to type it in the dialog to confirm; accounts that only sign in with Google or Facebook confirm without one.
NoteOn a selfhosted installation, every user except an administrator can delete their own account here. The installation always keeps at least one administrator, so the last one cannot.
See Also #
- Getting Started – Set up your first channel
- Selling Tickets – Choose a payment method per event once one is connected
- Advanced Channel Settings – Per-channel calendar sync, sending address and other integrations
- API Reference – Full API documentation for developers
- Webhooks – Payload formats and signature verification
Adapted from the Event Schedule user guide. Upstream screenshots are included for reference. Original guide